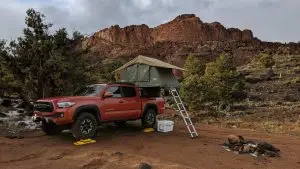

A Toyota Hilux can be a practical vehicle for an overland journey, whether the route involves gravel roads, remote campsites, mountain passes or long stretches between towns. But a successful trip depends on more than four-wheel drive and ground clearance. The vehicle needs to be mechanically sound, correctly loaded and equipped for the conditions you expect to encounter.
Preparing a Hilux for overlanding means checking its service history, tyres, brakes, fluids, suspension, electrical equipment and recovery gear before departure. It also means understanding the limitations of your particular model. Engine options, transmissions, payload ratings and four-wheel-drive systems vary between Hilux generations and markets.
This guide explains how to prepare your pickup systematically, what to inspect before travelling and when a model-specific workshop manual can help you plan maintenance or repairs.
1. Start with a mechanical inspection
Begin your preparation several weeks before departure, especially if the trip will take you far from repair shops. This gives you time to identify problems, source parts and arrange professional repairs without rushing.
Review the vehicle’s service records first. Find out when the engine oil, filters, coolant, brake fluid and other scheduled maintenance items were last serviced. Check whether any known faults remain unresolved.
Inspect the engine bay for visible leaks, damaged hoses, loose wiring and deteriorated belts where fitted. Look beneath the vehicle for fluid leaks, impact damage and corrosion. A clean engine bay is not proof of good mechanical condition, so records and inspection findings matter more than appearance alone.
If the Hilux has warning lights, abnormal noises, starting difficulties or overheating symptoms, diagnose these before adding luggage or accessories. Remote travel increases the consequences of a minor fault that could otherwise be repaired close to home.
2. Check engine oil and other fluids
Correct fluid levels and specifications are essential for reliable operation. Before departure, check the engine oil using the procedure specified for your model and engine. Look for unexplained oil loss, contamination or signs of leaks.
Inspect the coolant level only when the engine is cold. Check accessible hoses and connections for cracking, swelling or leakage. Never open a hot, pressurised cooling system.
Depending on the Hilux’s configuration, other service items may include transmission fluid, transfer-case oil, differential oil, brake fluid and power-steering fluid. Some versions use different systems, so do not assume every model has identical components or service requirements.
A workshop manual for the exact year and drivetrain can help identify service points, fluid specifications, inspection procedures and tightening torques. Confirm the vehicle’s model code, engine and transmission before using repair information.
If you discover a leak or repeatedly low fluid level, find the cause rather than simply topping up and setting off.
3. Inspect tyres, wheels and the spare
Tyres are among the most important items to prepare for a long overland route. Gravel, sharp rocks, mud and heavy loads can expose weaknesses that may not be obvious during ordinary urban driving.
Inspect each tyre for cuts, bulges, uneven wear, embedded objects and age-related deterioration. Check the sidewalls and tread carefully, including the spare. Make sure the spare is usable and that the jack and wheel-changing tools are present and in working condition.
Set tyre pressures according to the vehicle manufacturer’s recommendations for the load and driving conditions. Do not use a pressure simply because another Hilux owner recommends it. Tyre construction, vehicle weight, speed and terrain all affect appropriate pressure choices.
If you intend to reduce pressure for sand or rough terrain, learn the tyre manufacturer’s guidance and the vehicle’s limitations before the trip. Carry a reliable pressure gauge and a suitable compressor if your route requires reinflation.
Check wheel fasteners using the correct torque specification. If the wheels, tyres or suspension have been modified, confirm that the combination remains appropriate for the vehicle.
4. Examine brakes, steering and suspension
A heavily loaded pickup places additional demands on its brakes and suspension. Inspect these systems before departure, especially if the Hilux will carry camping equipment, passengers, water, tools or recovery gear.
Look for uneven tyre wear, leaking shock absorbers, damaged suspension bushes and visible damage to steering components. Listen for knocks over bumps and pay attention to steering looseness or vibration during a road test.
Brake inspection should include the condition of pads, discs or drums as applicable, hoses, accessible brake lines and fluid level. A spongy pedal, grinding noise, brake warning light or pulling under braking needs prompt investigation.
Do not rely on a quick visual check to establish that a component is safe. Some faults require lifting equipment, measurements or specialist diagnosis. Repairs involving steering and braking should be completed and checked by a competent technician when you do not have the necessary training and tools.
5. Inspect the chassis and underbody
The underside of a Hilux can be exposed to rocks, branches, mud, standing water and corrosion. Before a trip, inspect the chassis and underbody for cracks, serious rust, loose components, damaged protective plates and signs of previous impact.
Pay particular attention to areas around suspension mounts, crossmembers, recovery points and accessories attached to the chassis. Check that any aftermarket equipment has been installed correctly and does not obstruct important service points or create new hazards.
If the vehicle has previously travelled through deep water, ask a qualified mechanic whether additional driveline inspections are appropriate. Water ingress into components can cause damage even when no immediate symptom appears.
Clean accumulated mud from vulnerable areas before inspecting them. If you find structural damage or substantial corrosion, obtain a professional assessment before loading the vehicle for remote travel.
6. Understand the payload before packing
One of the easiest mistakes in overland preparation is carrying too much equipment. A canopy, roof rack, drawers, auxiliary battery, water tank, passengers and camping supplies all contribute to vehicle weight.
Check the payload and axle limits for your specific Hilux using the vehicle’s identification plate and official documentation. The permissible load varies by variant and market. Do not assume that a suspension upgrade increases the vehicle’s legal or manufacturer-rated carrying capacity.
Make a list of everything you intend to carry, including:
- Passengers and personal luggage.
- Water, food and cooking equipment.
- Tools, spare parts and recovery equipment.
- Roof racks, canopies, drawers and other fitted accessories.
- Batteries, refrigerators and electrical accessories.
Place heavy items low and secure them so they cannot move during sudden braking or on rough terrain. Avoid concentrating excessive weight at the rear or high on the roof.
If the load is close to the permitted limit, have the vehicle weighed in its travelling configuration. Confirm that the total and individual axle loads remain within the applicable limits.
7. Prepare the four-wheel-drive system
If your Hilux has four-wheel drive, understand how its system operates before entering difficult terrain. The available modes and operating instructions differ between generations and specifications.
Read the owner’s manual to understand when each mode may be used, any speed restrictions and the correct procedure for engaging or disengaging the system. Do not experiment with unfamiliar controls on a steep or slippery track.
Check for warning lights, unusual driveline noises and fluid leaks. If the vehicle has a transfer case and separate differentials, follow the correct inspection and service schedule for those components.
Test the system in a safe, suitable location before the journey. If engagement problems or warning lights occur, arrange diagnosis rather than assuming the system will work when needed.
8. Carry recovery equipment appropriate to the route
Recovery equipment should match the terrain, vehicle weight and driver’s experience. A basic kit may include a rated recovery strap, suitable shackles, a shovel, traction boards, gloves, a tyre repair kit and a compressor.
Only use recovery points that are designed and rated for the intended load. A transport tie-down point is not necessarily a recovery point. Never attach recovery equipment to an unknown suspension component or an improvised mounting point.
Understand the instructions and limitations for every item you carry. Dynamic recoveries can store significant energy and cause severe injuries if equipment fails or people stand in unsafe positions. Where possible, choose lower-risk recovery methods and seek experienced assistance when the situation exceeds your training.
For remote travel, also plan communications, navigation, emergency supplies and a way to tell someone your route and expected return time.
9. Check the electrical system and accessories
Long journeys often involve additional electrical equipment, including auxiliary lights, refrigerators, communication devices and charging systems. These accessories can add complexity to the vehicle’s wiring and increase demand on its electrical system.
Inspect the main battery, terminals, visible wiring and accessory connections. Look for loose terminals, damaged insulation, unfused wiring or poorly secured cables. Make sure accessories are installed according to their manufacturer’s instructions.
Carry the correct spare fuses if appropriate, but never replace a fuse with a higher rating to stop it from blowing. A repeatedly blown fuse may indicate an underlying fault that needs diagnosis.
If you have added an auxiliary battery or other major electrical equipment, check that the installation is suitable for the vehicle. Use the correct wiring diagram and service information for electrical repairs, and consult an automotive electrician for unfamiliar or complex circuits.
10. Pack practical spares and tools
The right spares depend on the vehicle’s condition, route length and access to parts. Carrying every conceivable component is neither practical nor necessary. Focus on equipment that is appropriate for the vehicle and that you know how to use safely.
Useful items may include:
- A tyre pressure gauge and suitable compressor.
- A jack, wheel brace and correct wheel-changing tools.
- Basic hand tools and a torch.
- Suitable spare fuses and bulbs where applicable.
- A tyre repair kit appropriate for your tyres.
- Gloves, protective eyewear and a first-aid kit.
- Drinking water and emergency supplies.
- Service information for the exact Hilux model.
Do not attempt roadside repairs that require specialist equipment or create an unacceptable safety risk. The purpose of carrying tools is to handle appropriate minor issues, not to replace proper workshop facilities.
11. Use a workshop manual for model-specific information
A workshop manual can be particularly useful when preparing an older or heavily used Hilux. While the owner’s manual covers vehicle operation and routine care, workshop documentation may provide more detailed service procedures and technical specifications.
Depending on the model and documentation available, it may include:
- Fluid specifications and service capacities.
- Component inspection and replacement procedures.
- Tightening torques and adjustment information.
- Wiring diagrams and electrical troubleshooting.
- Engine, transmission and driveline service instructions.
- Diagnostic procedures for particular faults.
Coverage varies by manual, model year, engine and market. Confirm that the document matches your vehicle before following a procedure or ordering parts.
If you need repair documentation, browse the Toyota workshop manual listings at CarManuals.org and verify that the relevant manual covers your exact Hilux configuration. Use the applicable manufacturer’s information for safety-critical procedures and technical specifications.
12. Complete a final pre-departure check
Carry out a final inspection shortly before leaving. Check fluid levels, tyre pressures, lights, brakes, mirrors, load security and the operation of any accessories that you depend on during the trip.
Make sure registration and insurance documents are current for the countries or regions you will visit. Check road conditions, weather forecasts, fuel availability and any route restrictions. If the route crosses remote areas, identify suitable stopping points and emergency contacts.
After the first short drive with the vehicle fully loaded, stop somewhere safe and check for loose cargo, new noises, warning lights or leaks. Do not touch hot components or crawl underneath an unsupported vehicle.
After demanding off-road sections, inspect the vehicle again when it is safe to do so. New vibrations, fluid leaks, steering changes or warning lights should be investigated before continuing.
Frequently asked questions
How early should I prepare my Hilux for an overland trip?
Begin several weeks ahead if possible. This gives you time to complete scheduled maintenance, diagnose faults, order parts and test equipment before departure.
Does every Toyota Hilux have the same service requirements?
No. Engine, transmission, drivetrain, model year and market can affect maintenance procedures and specifications. Always verify information for the exact vehicle.
Should I modify the suspension before overlanding?
Not automatically. First assess the intended load, terrain and condition of the existing suspension. Any modification should be suitable for the vehicle and must not compromise handling, braking or legal requirements.
What should I check before driving on rough roads?
Inspect tyres, brakes, steering, suspension, underbody protection, load security and recovery equipment. Choose suitable routes and avoid terrain beyond your vehicle’s capability or your experience.
Why carry a workshop manual on an overland trip?
A suitable manual can provide model-specific repair information and technical specifications. A downloaded copy may be useful where internet access is unavailable, provided it is complete and matches the vehicle.
Final thoughts
Preparing a Toyota Hilux for an overland trip is about reducing avoidable risks before leaving home. A careful inspection, a realistic load plan, suitable tyres, reliable recovery equipment and a maintenance record are more valuable than modifications alone.
Start with the vehicle’s condition and service history, address known problems and verify the specifications for your exact model. A workshop manual can help you understand the maintenance and repair information required, while qualified technicians should handle work that needs specialist tools or expertise.
Outreach Road is an independent publication, not affiliated with or endorsed by Toyota Motor Corporation. Always verify maintenance and repair procedures against the appropriate vehicle documentation.